

Vpssim is one of my favorite VPS installation scripts today.
It is lightweight, full of features required when installing a VPS. Especially Vpssim is very user-friendly.
Therefore, I recommend you to use Vpssim right after creating VPS.
In addition to vpssim, hocvps is also another popular VPS installation script. The author of the script claims his script is lighter.
But my personal experience did not see much difference. Meanwhile, hocvps lacks a lot of features.
Including essential features such as installing Let’s Encrypt certificates. Manually installing these features is very time consuming and quite difficult for VPS novices.
What is VPSSIM?
VPSSIM is a VPS optimization and installation script. It will install LEMP stack (Linux, NGINX, Maria DB, PHP-FPM on CentOS 6/7.
Thanks to VPSSIM, it becomes much easier to build a WordPress website on a VPS if you are not technically savvy.
As said this script is only for CentOS operating system. If your VPS has Ubuntu installed, refer to EasyEngine.
Some outstanding features of vpssim:
- Latest NGINX
- PHP-FPM with FastCGI
- Selection of PHP versions 5.4, 5.5, 5.6 and 7.0
- Pre-installed phpMyAdmin, Zend Opcache, Memcached, Google Pagespeed.
Instructions for installing VPSSIM
You need to prepare:
- A brand new Linux VPS server just installed CentOS 6/7. If you have not yet rented a VPS, you can refer to cheap quality VPS services here .
- At least 512MB RAM for CentOS 6 and 1 GB RAM for Centos 7. If you have not created swap for VPS refer here.
- SSH login with root user (see MobaXTerm ).
First, run the following commands to install VPSSIM:
The first command to install the wget utility if it is not already there. Then download the installation script of Vpssim. Make this script runnable. Finally run the install script
|
1
2
3
4
|
yum –y install wget
wget –no–check–certificate https://vpssim.com/install
chmod +x install
bash install
|
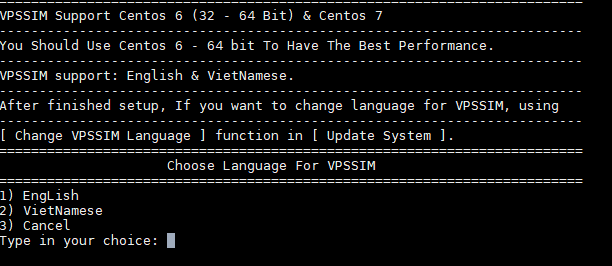
You will ask which language to choose for vpssim. With the technique of choosing English, it is sometimes easier to understand than Vietnamese:
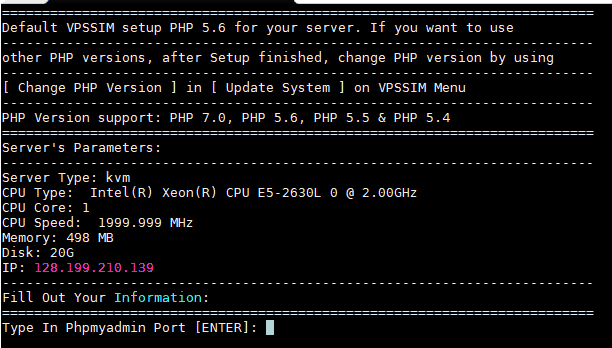
Next enter the port for PhpMyAdmin. This port is in the range (100 – 65535) and does not match the port here.
Enter your email address:

Select MariaDB version enter 1 then Enter to select version 10.0

Enter the password for the root user of MySQL (remember to save the password in a text file)

vpssim wants you to confirm with the information you enter. Select 1 and then Enter to accept.

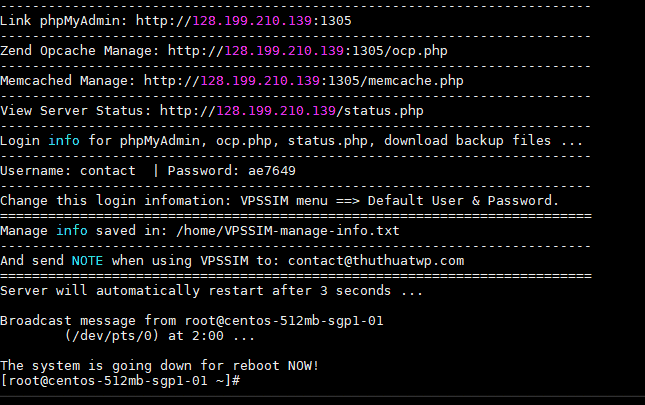
After a few minutes vpssim installed successfully. You can find important information at /home/VPSSIM-manage-info.txt .
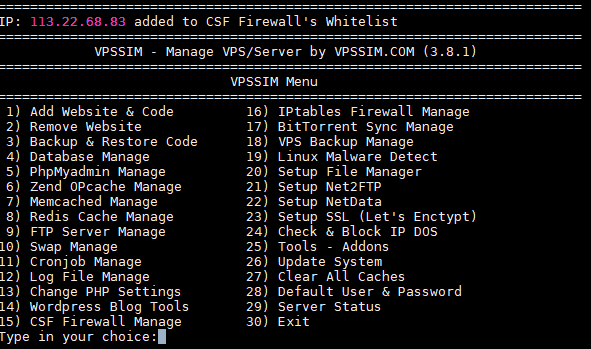
At this point, the connection to the server is broken. As soon as you reconnect you can type vpssim then enter to open the function menu of vppsim
By default PHP version 5.6 will be installed. If you want to switch to version 7, select 26 and then Enter.
Continue to choose 6

Select 1 and then Enter to vpssim install PHP 7.
After the installation is complete, exit the main menu of vpssim..
Next we will start to install WordPress website .


