

These days VPS is no longer a luxury service.
There are many cheap VPS services for 5$/month for you to choose from.
In today’s post, I share how I moved my website from a shared host to a VPS with VPSSIM installed.
I find this method quite fast and suitable for novice VPS like me. Because this way requires less command line manipulation.
If you have a faster and less command-line way, you can share more below.
In this tutorial, I don’t go into too much detail because I think you are familiar with hosting. I just listed the steps you need to do.
If something is not clear, you can comment below.
Now let’s start moving the host to VPS.
Contents
Step 1: Prepare VPS
First you need to create VPS and install VPSSIM. For example, you can refer to how to create a Vultr VPS or create a Linode VPS to get 20$ of free credit.
Immediately after creating the VPS, you remember to update the VPS, increase the security of the SSH connection and set the timezone for the standard. How to do I wrote in post 7 things to do after renting VPS .
Next, you follow the VPSSIM installation instructions .
You access the shared host’s cPanel. Open File Manager. Close call back source code website into a zip file.
Next open phpMyAdmin, export the database to the sql file.
Step 3: Import the database and extract the source code on VPS
In this step you have 2 things to do. Move source code and database to new VPS.
I will handle each one. After transferring the source, process the database transfer. Later, if you get used to it, you can do it in parallel or whichever task you prefer first.
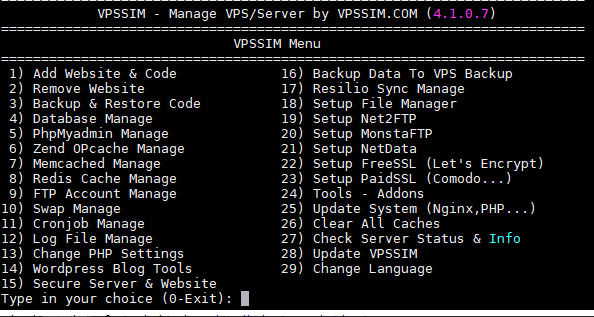
First you open up vpssim by typing the command vpssim.
Choose the first function Add Website & Code
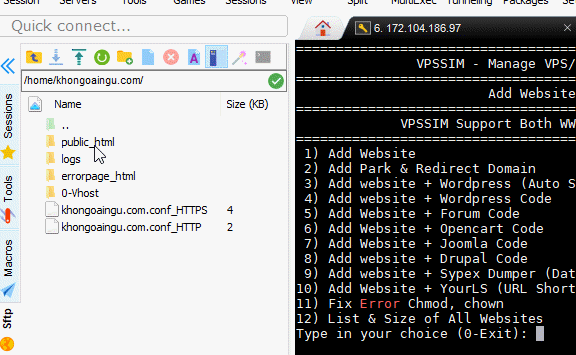
Next you choose the first function 1) Add Website
You add your domain name (if your domain name uses www, remember to type it out). VPSSIM will ask if you want to create a database. You choose not to create because we will create the database in the step below.

After VPSSIM creates a website, it will create an empty directory at /home/your-domain-name/ . You can now drag the zip file containing the source code into the public_html folder. Here I use MobaXTerm, so I have this feature.
After uploading the zip file to VPS is finished, exit VPSSIM, access the folder containing the zip file, and then proceed to extract it.
For example, here are two commands I use to access the zip file upload directory containing the source and the extract command. If you get an error unzip command not found, the unzip utility is not installed by default on the VPS, install it with the familiar command yum install unzip .
cd /home/khongoaingu.com/public_html/
unzip khamphaso.zip
At this point, you have completed the source code transfer. Only a small step to grant access to the source file you just moved. If you forget this step when installing the plugin it will ask you to provide your FTP account username and password.
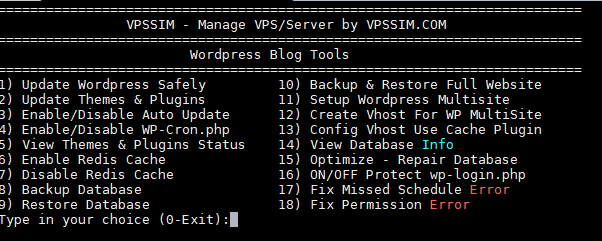
Open vpssim. Select the function named WordPress Blog Tools .
Then select the function Fix Permission Error . Next, you just need to select the website you want to fix this error.
Now we will move on to the task of importing the database to the VPS.
At the main interface of VPSSIM, you select the Database Manage function . Select the Create Database function .
Next, just enter the database name, user and password to match the information in the wp-config.php file of the website you are moving to the VPS.

There are two ways to import data from the old host to the database you just created.
The first way you use phpMyAdmin. As follows:
The phpMyAdmin tool is located in the VPSSIM management tool located at http://yourIPadress:port/svm. port here is the port you enter when installing vpssim

Use the user account you created above to log in to phpmyadmin. Finally upload the sql file and run it.

The second way you use the restore database tool available in the function menu of VPSSIM. So you do not need to leave the vpssim screen. But the downside is that the free vpssim version does not support it. You must upgrade vpssim to business to run this function.
Go to 4 (database management) -> 8 (database recovery) then follow the instructions

Step 4: Point the domain and install the Let’s Encrypt certificate.
Until this step, your website still has a domain pointing to a shared host. You need to point the domain to the VPS.
Personally, I use Cloudflare DNS , so I just update the A record by changing the IP of the shared host to the IP of the VPS.
If you are using Cloudflare CDN you must disable the yellow cloud if you want to install the Let’s Encrypt certificate.
Regarding the Let’s Encrypt certificate installation, simply select the Setup FreeSSL (Let’s Encrypt) function and follow the instructions. Remember to select the Auto Renew Certificate function so that the certificate is automatically renewed after 90 days.
It’s done. You already know how to move your website from a shared host to a VPS with VPSSIM installed.
In fact, switching from shared host to VPS is not as difficult as people think.
If you do a good job without errors, your users will not realize that you have just transferred the host to the website.


