

You have completed the WordPress installation. On localhost or on a host .
It’s time to explore the world of WordPress.
In this article we walk around the main features of WordPress
Contents
1.Home page interface
As in this article , I have guided you to build a page named local. on localhost. Now we enter the address http://local. to see the homepage interface.

A: The header of the page includes items such as site name (page name), page description (tagline) like a slogan.
B: This section is called the sidebar or the content bar. It can be left, right or both sides depending on the theme. Inside the sidebar, you will see widgets like Recent Posts, Recent Comments.
C: This is a good post or article. When you write a post and publish it on the website it will show up on the homepage.
D : This is the details of the post. It usually includes the date, the number of comments, the number of views, the author of the post. Depending on the theme, you can customize what information is displayed.
Scroll down and you will see the footer. It is the last part of the website. Here you will see information such as copyright, referral. This section varies by theme.

Now click on the article to see the details

Post content : Here you will see all the content related to the post such as post name, post content, date of posting, author, category of the post.
Comment area : Here will display a list of comments related to the post you are viewing. Below is the form to submit comments
By default, when you log into the admin page, you will see a black toolbar (called the Admin Bar ). On this toolbar you have links to functions such as creating new posts, Pages, viewing usernames, number of comments waiting for approval.

2.Admin page
If you are not logged in, you can enter the address http://local./wp-admin (the part of the domain name you change to suit your environment). Enter username and password to login
If you are logged in and are on the homepage. You can hover over the website name in the Admin Bar. Select Dashboard to access the admin page.
This is the admin page interface
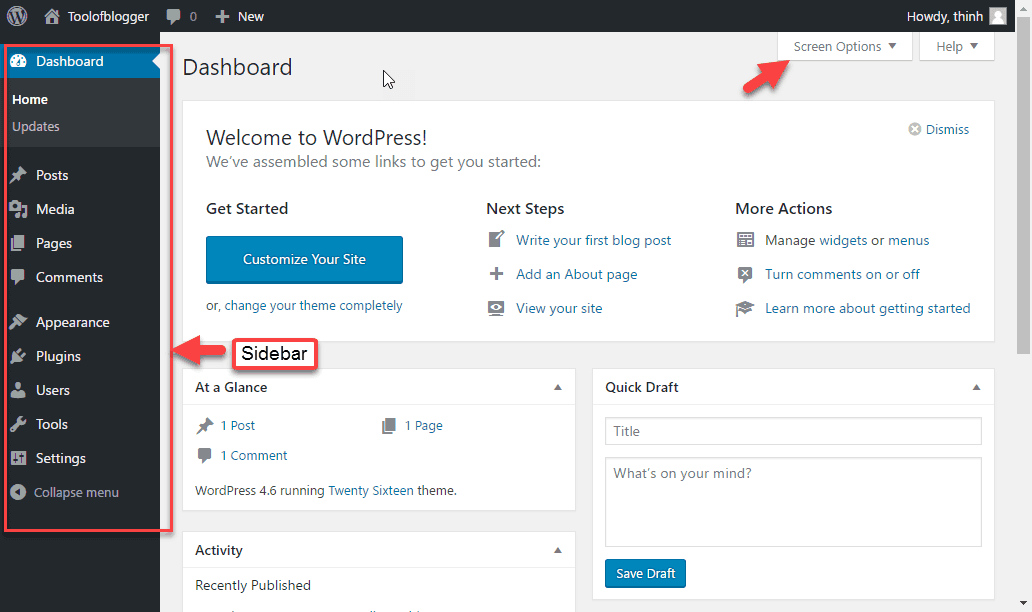
To the left of the Dashboard is a black menu bar (sidebar) containing links to areas that need administration. To the right of it will display the corresponding content.
Dashboard Home
By default, when you go to the Dashboard page, you will see areas divided into small blocks:
Welcome : this is a place to contain convenient links for you to start working with WordPress such as a link to the post editor page. Or link to the widgets management area.
At a Glance : Overview statistics of your website. Specifically, it tells you the number of posts, pages, comments, and which version of WordPress you are using. Besides, you know what theme you are using.
Quick Draft : In this block, you can draft a Post and press the Save Draft button to save the draft. Then you can go to the post management screen to edit.
Activity : You will see a history of activities on the website such as recent posts, latest comments.
WordPress News breaking news updates from WordPress or specialized WordPress sites.
You can control which blocks show through the Screen Options function in the bottom right corner.
Sidebar
This is the area you usually work in. Some menu items have submenus but do not display by default. So you have to hover over that menu item to see it, for example, Settings.
Posts : This is where you manage your posts, categories, and tags.
Media : This is where you manage media files like images, videos, music and so on.
Pages : This is where you manage your website’s pages.
Comments : This is the place for comment management.
Appearance : The Apperance section helps you change the entire appearance of the entire website including:
- Themes
- Widgets
- Menus
- Header
- Background
- Manual file editing
Plugins : Plugins that extend WordPress functionality. In this area, you can view installed plugins, as well as add or remove installed plugins.
User : In this section, you can create additional users and assign permissions to that user.
Tools : Provides you with many useful tools such as importing or exporting posts from other blogging platforms like Tumblr to WordPress and vice versa.
Settings : In this section, you manage the settings for the entire website. We will take a closer look at this area.
Explore the Settings area
Check overall settings (Settings -> General)
While there are a few information you have set up during the installation. But there is still a lot of other information you must check before you start working with your website.
In the left menu of the admin area, select Settings -> General
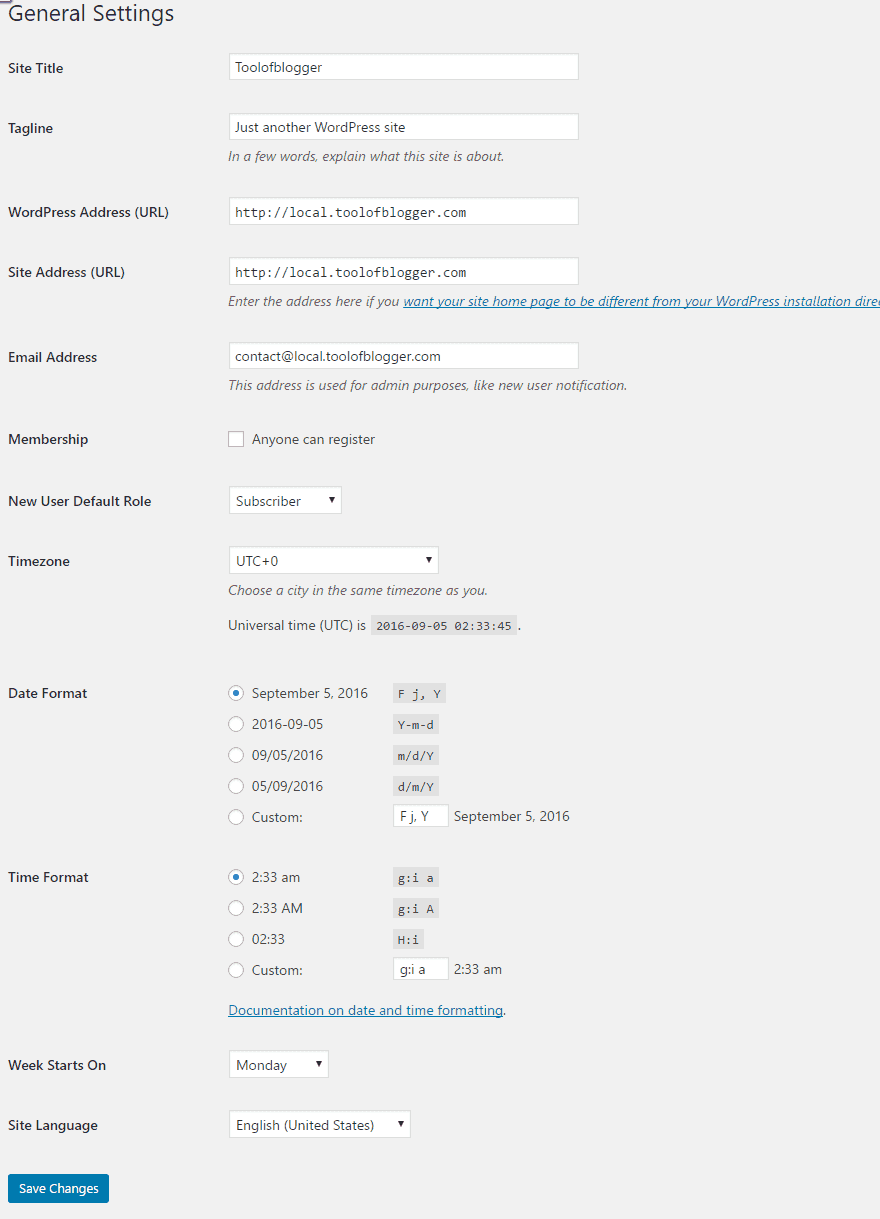
Site Title : During the installation process you must provide the website name. Here you can change it back if you want. The name of the website will be displayed by default in the header area of the website
Tagline: Just like the site title, you can change the tagline to suit.
WordPress Address (URL) : The address of your current WordPress website. This address will affect the link of Post and Page on the website.
Site Address (URL) : The address of your home page. If you install WordPress as your homepage, it should be the same as the WordPress Address.
Do not change these addresses unless you fully understand your actions. Because it can break your page.
E-mail Address : The email address of the website administrator. This email address will be used to send important notices regarding the website.
Membership: If you tick the Anyone can register box, guests can register themselves for a user account on your website at: http://domain/wp-login.php?action=register.
New User Default Role: Allows you to set the default user group into which new registrants will be included.
Timezone: The time zone you want to use, Vietnam will be GMT + 7
Date Format: The date format you want to display on the website
Time Format: The time format you want to display on the Website
Week Start On: You want to set the start day of the week.
Site Language: The language you want to use on the Website.
Writing settings (Settings -> Writing)
The settings in this area control how WordPress formats and publishes posts.

Default Category Post : Default Category of a Post if you forgot to select Category
Default Post Format : Default post format type if you forgot to choose
Post via e-mail : Feature to post via email
Update Service : Notification pages when you publish a new article. In other words as soon as you publish a new post you want WordPress to automatically send pings to the configured services. This makes your blog easier to find.
Settings about reading Settings – Reading
This admin area will affect the display of content on the website.

Front page displays option : you have 2 options, display the latest posts on the homepage or display a static page as the homepage.
Blog pages show at most : The number of posts displayed on each of your blog pages. The default is 10 but you can change this number to suit your needs.
Syndication feeds show the most recent : The number of new posts displayed on the website’s RSS Feed page ( http://domainname/feed )
For each article in a feed, show :
- Full text : display content on RSS Feed with full content
- Summary : display content on RSS Feed with shortened version.
Search Engine Visibility : If you select this, Google bots will not index your content. As a result, your page does not show up on Google search results. Your goal when creating your website is to be found by as many people as possible. So make sure you don’t select this option.
Setting Settings – Discussion
This area affects the comment feature on your website.

Default article settings :
The settings here are related to enabling the comment related feature. You can edit each post/page individually.
a. Attempt to notify any blogs linked to from the article : Notify the websites that you have linked in the post/page so that they agree to place a link pointing to the website through the pingbacks feature.
b. Allow link notifications from other blogs (pingbacks and trackbacks) : Allows you to receive pingbacks or trackbacks notifications from another website.
Pingbacks and trackbacks
Let’s learn more about these two terms together. Pingbacks are an automated form of comments for a post. This is generated when there is another WordPress blog that links to that blog.
For example, you write a post on your blog Another person writes a post on their blog. And they link to your post. If both blogs have pingbacks enabled, WordPress will send you a pingback as a comment on your post. You have a choice to display or not.
Trackbacks are similar to pingbacks. The difference is that it is not sent automatically by WordPress, but by the post author himself. Most pingbacks and trackbacks are spam, you should disable this from your site by unchecking Allow link notifications from other blogs (pingbacks and trackbacks)
c. Allow people to post comments on new article s : allows visitors to post comments on new posts/pages.
Other comment settings :
Other settings related to posting comments.
a. Comment author must fill out name and e-mail: Commenters must provide their name and email address.
b. Users must be registered and logged in to comment: You must be logged in to the website to post comments.
c. Automatically close comments on articles older than [14] days : Allows to automatically close comments of a post/page if it is older than [14] days.
d. Enabled threaded (nested) comments x levels deep: Enables a secondary hierarchy of comments and uses x secondary tiers (this applies to the reply function)
e. Break comments into pages with [50] top level comments per page and the last page displayed by default: Auto pagination of post/page if it has more than [50] comments and display in order of first/last page
f. Comments should be displayed with the [older/newer] comments at the top for each page : The order of comments will be displayed by newest/oldest.
E-mail me whenever :
Here, you will set up to receive email notifications about comments.
a. Anyone posts a comment : Receive email notifications when someone posts a comment.
b. A comments is held for moderation: Receive email notification when a comment is pending approval.
Before a comment appears:
Condition when a comment is displayed
a. Comment must be manually approved : Each comment must be approved before being displayed on the website.
b. Comment author must have a previously approved comment: The comment will be displayed if the author of the comment already has a previously approved comment.
Comment moderation :
Comments are automatically put into pending status if they contain keywords, links, IP addresses, or content in this list. Each blocking rule must be placed on a separate line.
Comments Blacklist:
Words forbidden to comment. Each forbidden word is declared one line. Comments containing forbidden words will be marked as Spam
Avatars:
Option to display the comment sender’s Avatar image
Avatar Display : Select if you want to display the comment sender’s avatar image.
Maximum Rating : The maximum type of avatar allowed to be displayed on the Website
Default Avatar : The default avatar image if the user has not set up Gravatar.
Media setting mode (Settings -> Media)
The settings there will affect the upload (upload) of media files such as images, videos, music, etc.
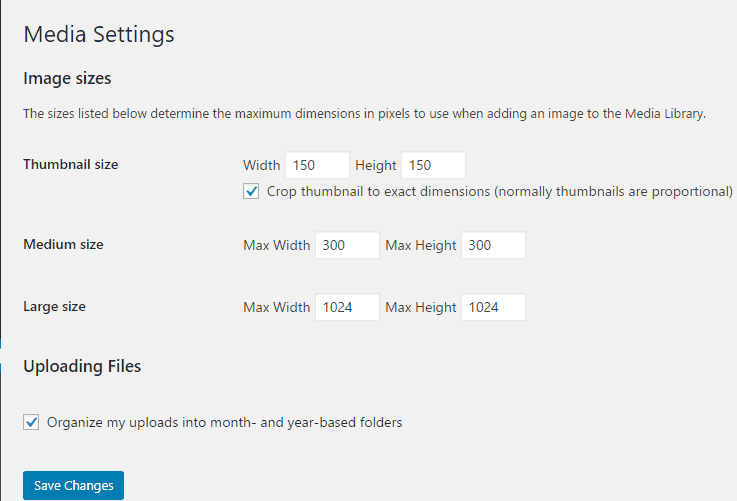
Image sizes: The settings in this area will determine the default WordPress image size when an image is uploaded to the gallery. When an image is uploaded, WordPress stores 3 types of images. You can change the size of each picture style.
Thumbnail size: thumbnail type image size
- Crop thumbnail to exact dimensions…: Create a thumbnail image by cropping the original image to the exact same size as the setting.
Medium size: Medium image size.
Large size : Large image size
Uploading Files : settings related to uploading files
Organize my uploads into month- and year-based folder : Automatically put uploaded files into folders with date structure compared to upload time.
Set static path (Settings -> Permalink)
Permalinks are the links WordPress generates when you create a post or page on your site.

Common Settings : Common Settings
Default : Default path structure (seemingly dynamic)
Day and name : path structure with full display date and post name.
Month and name : path structure with month, year and post name.
Numeric : The path structure shows the post’s ID instead of the name
Post name: Show only the post name on the link
Custom Structure : Customize arbitrary path structure
Optional : Optional settings are not required
Category base : The parent URL of the links to the category page. By default it will be http://domain/category/name-category/ if you enter it as chuyen-muc then it will display http://domain/chuyen-muc/name-category
Tag base : the parent path name of the path to the tag pages. By default it will be http://domain/tag/name-tag .
About Custom Structure:
With Custom Structure, you can have the path structure you love. To build custom path structure you can use structure keywords (wrapped by % character) like below:
- %year% year of posting
- %monthnum% month of posting
- %day% date of posting
- %hour% posting hours
- %minute% minutes of posting
- %second% second post
- %post_id% post id number
- %postname% name of the post (reduced to “tieu-de-bai-viet”)
- %category% post’s cagetory name (if you choose 2 categories for a post, it will display 1 of 2 and stay fixed)
- %author% – post author name
For example, if you want to have a path structure: http://domain/category-name/post-name , then I will fill in the Custom Structure section as %category%/%postname%
For most website types, you should set the permalink to post name. Also be careful not to change your permalink settings after your site has been published. Because of such a change, you will break links on your site, including links between pages, or links from outside.
Epilogue
WordPress provides you with 2 interfaces: the user interface and the admin interface. The user interface is where the interaction between your guests and website happens.
The admin interface acts as the brain of your website. This is where you will become the driver to control every aspect of the website.
With this article, I helped you get acquainted with both interfaces. In particular, you already know a lot of setting modes for websites through the Settings menu.
If you have problems anywhere, leave a comment below.


