

Contents
Prepare
Before you start installing WordPress, you need to prepare the following:
- The VPS server installs OpenLiteSpeed and the necessary components like this tutorial on CentOS 7 .
- Add website in OpenLiteSpeed . After this step, you have pointed the domain to the IP of the VPS.
- Connect to VPS using MobaXTerm with root user.
Note: You have the flexibility to change the parameters to suit your situation such as the database name.
How to Install WordPress in OpenLiteSpeed
Step 1: Create a database
Login to Maria DB with root user:
|
1
|
mysql –u root –p
|
Create a wordpress database:
|
1
|
CREATE DATABASE wordpress;
|
Create user:
|
1
|
CREATE USER ‘wpuser’@‘localhost’ IDENTIFIED BY ‘wppassword’;
|
Grant permissions to the user:
|
1
2
3
|
GRANT ALL PRIVILEGES ON wordpress.* TO ‘wpuser’@‘localhost’ IDENTIFIED BY ‘wppassword’;
FLUSH PRIVILEGES;
exit;
|
Step 2: Install WordPress:
Access the document root:
|
1
|
cd /usr/local/lsws/elegantjava.info/html
|
Download the latest version of WordPress:
|
1
|
wget http://wordpress.org/latest.tar.gz
|
Decompression:
|
1
|
tar –zxvf latest.tar.gz
|
Move out the html root folder and delete the empty wordpress folder:
|
1
|
mv wordpress/* /usr/local/lsws/elegantjava.info/html && rm –rf wordpress
|
Permissions for the folder
CentOS:
|
1
|
chown –R nobody:nobody /usr/local/lsws/elegantjava.info/html
|
Ubuntu:
|
1
|
chown –R nobody:nogroup /usr/local/lsws/Example/wordpress/
|
You can now install WordPress in your browser as usual.
Step 3: Configure WordPress to work with OpenLiteSpeed.
In this section we will configure OpenLiteSpeed to use the cache module (OpenLiteSpeed does not have the LSCache module like the Enterpise version but it also has a cache module with similar functionality), the .htaccess file, as well as using the LiteSpeed Cache plugin
Configuring the cache module
In WebAdmin, go to Server Configuration > Modules . Click the Add button
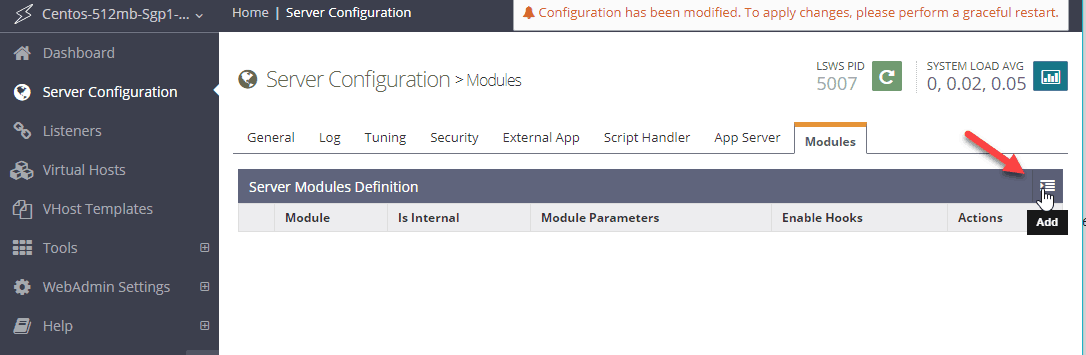
The Module field you enter into cache .
In the Parameters module field, copy and paste the following information:
|
1
2
3
4
5
6
7
8
9
10
11
12
|
enableCache 0
qsCache 1
reqCookieCache 1
respCookieCache 1
ignoreReqCacheCtrl 1
ignoreRespCacheCtrl 0
enablePrivateCache 0
privateExpireInSeconds 1000
expireInSeconds 1000
storagePath cachedata
checkPrivateCache 1
checkPublicCache 1
|
Click the Save button to save the configuration.
Configuration using file .htaccess
Go to Virtual Hosts. Click the View button for the Virtual Host you need to add Rewrite Rules:

Switch to the Rewrite tab and then select Edit

Select the Yes button and then click the Save button:

Click Edit in the Rewrite Rules section and add:
|
1
|
rewriteFile /usr/local/lsws/elegantjava.info/html/.htaccess
|

Click the Graceful Restart button.
Now you configure Permalink in WordPress to see if there are still 404 errors.
Install LiteSpeed Cache
Install and activate LiteSpeed Cache as usual:
By default LiteSpeed Cache is active as soon as activation is complete.
To check if LiteSpeed Cache is working do the following:
Now you open a browser without the webmaster login. Go to the website and open the Inspect tool.
If you see information like the one I circled in the image, LiteSpeed Cache is working OK:
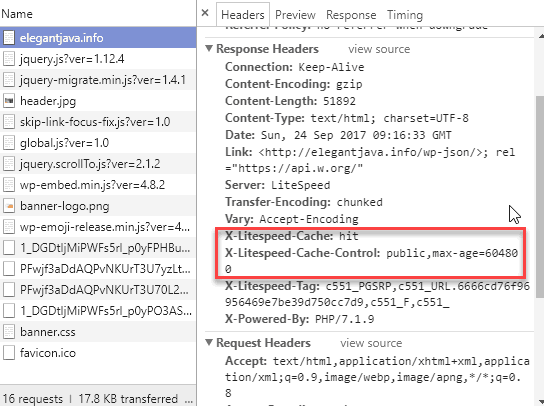
Default Cache for 604800 seconds equivalent to 7 days. You can reset it in the configuration section of the LiteSpeed Cache plugin.
At this point you have completed the installation of a WordPress website in OpenLiteSpeed.
You also learn how to configure the LiteSpeed Cache plugin to work with OpenLiteSpeed.
Note : You should edit the php.ini configuration to avoid the file upload limit error in WordPress . Remember to restart OpenLiteSpeed when finished editing the php.ini file.
Reference source
http://open.litespeedtech.com/mediawiki/index.php/Help:How_To_Set_Up_LSCache_For_WordPress


