

You have chosen the W3 Total Cache plugin to speed up WordPress.
Congratulations, it was a wise decision.
Although as soon as you install it, W3 Total Cache comes with a default configuration. This configuration also helps speed up your WordPress website partially.
But surely you still need to optimize more.
And in this article, I will “match the sword” between W3 Total Cache and CloudFlare (free plan) as one of the comprehensive WordPress acceleration tips.
If you still have not installed CloudFlare for your website, you can refer here . You should install Cloudflare first. Only then will you continue reading this article.
So how do we measure the effectiveness of these settings?
In this article, I use GTMetrix as a tool to help me check and evaluate the speed achieved after configuration. Sometimes these new day settings are effective.
Of course, with the configuration in this article, I have checked ok on ToolofBlogger itself. But I still recommend that you back up your website before starting to practice. The WordPress backup tool I recommend is UpdraftPlus .
More info : ToolofBlogger is using A2Hosting ‘s shared host (Swift package so the server doesn’t support cache like Turbo package) with server located in USA and Theme Junkie theme .
Here is the GTMetrix result after applying the setup tips in this post:

Besides GTMetrix, another popular speed testing tool is Pingdom . These are the speed records that I received.

Pingdom results from Sweden

Pingdom results from Australia

Pingdom results from the US
Ok. First you need to install the W3 Total Cache plugin as usual. After the installation is complete, we begin to configure W3 Total Cache.
Contents
Extensions in W3 Total Cache
The reason I mentioned this part first, is because there are many cool things in this that are very good for the website. But by default they are not enabled:.
Now go to Performance -> Extensions . You enable Cloudflare and WordPress SEO so they can talk to W3 Total Cache.

Next, we will configure W3 Total Cache to connect to Cloudflare.
Connecting W3 Total Cache and Cloudflare
To connect to Cloudflare, you need 2 information: the email you registered to use Cloud’s services and the API Key. You get the Key API here .

Next step, you go to Performance -> General . Scroll down to the section Network Performance & Security powered by CloudFlare (This section is only visible when you have activated Cloudflare in the step above).
In addition to the email and api key, you need to enter the domain. Note that the Rocket Loader section, you choose Off if your website is running AdSense. Toolofblogger does not use AdSense ads to avoid affecting the user experience. So I let it be Automatic

Finally, you go to Cloudflare, select the website you are configuring, go to Page Rules. You create a page rule like below. Cloudflare has detailed instructions on PageRule . If you like, you can read more.

In the Speed section, make sure the 3 options Javascript, CSS, HTML are checked.
In the Caching section, you choose “No Query String” to avoid the ” Remove query strings from static resources ” error when testing site speed on GTmetrix or Pingdom.

Now we move to the W3 Total Cache configuration section. In this section, I will only mention the places you need to change compared to the original configuration, the rest you leave as is.
Standard W3 Total Cache Setup
General Settings
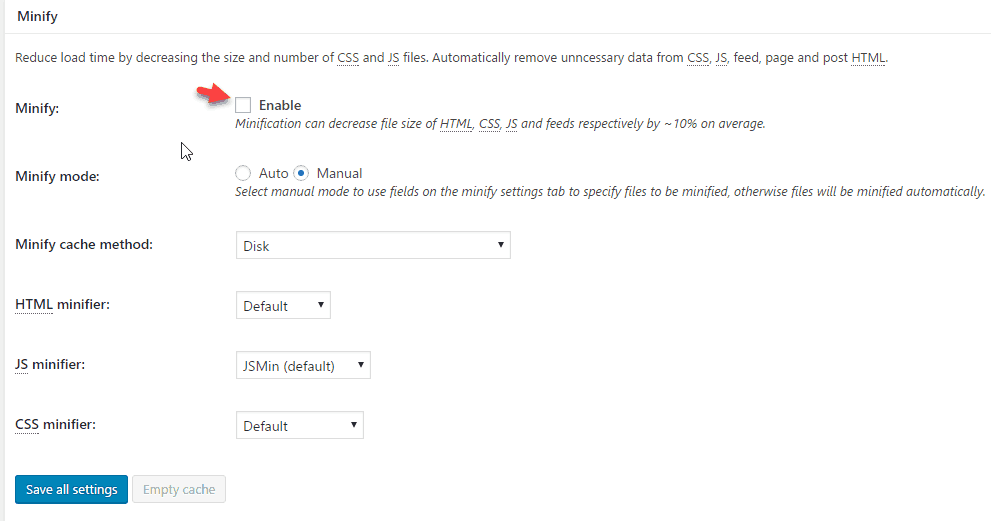
In the Minify section , you uncheck Enable because the functionality is transferred to Cloudflare.
Scroll down, the Miscellaneous section , you choose the option as the arrow below indicates:

Page Cache
Select “ Cache SSL(https) requests” if your website uses SSL

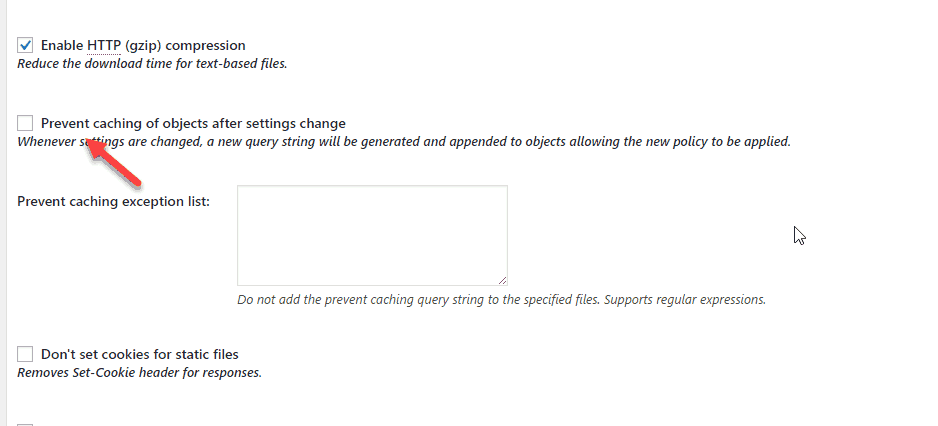
Browser Caching
You uncheck the option as below to remove the ” Remove query strings from static resources ” error.
For Shared Hosting you need to check for Disk cache method of dabatase cache and object cache. If you see an increase in speed, use it, if you don’t improve the speed, don’t choose.
Notes on setting for VPS Hosting
The plugin author suggests some of the following settings:
- Select APC for database cache
- Select Disk enhanced for page cache
- Select Disk for Minify
- Memcached for object cache
In this section, you need to see which hosting service provider supports which cache method to choose.
Epilogue
W3 Total Cache has always been a popular WordPress acceleration plugin today. But for optimal speed, you can’t just rely on the default configuration.
I have given you suggestions on how to set up the optimal W3 Total Cache. In particular, W3 Total Cache works very well with Cloudflare.
The combination of these two tools will surely surprise you with the speed you get.
It is this solution that has brought very good results for my website.
Have you used this combination before? Please share your experience below.


