

Apache Tomcat is a web server used to run web applications written in Java.
Apache Tomcat implements Java related technologies such as Servlet, JSP. As of the time of this article Apache Tomcat 9 is the latest version.
In today’s tutorial I will show you how to install Apache Tomcat 9 on CentOS 7.
Contents
Prepare
You need to prepare the following:
- A brand new Linux server with CentOS 7 installed. I used Linode to complete this tutorial. You can refer to cheap Java Hosting service.
- Log in to the Linux server with an SSH Client such as MobaXTerm as the root user.
Step 1: Install Java
First you need to update the system. Run the following command:
|
1
|
yum –y update
|
You also need some utility tools like wget and nano, which we will use in a later step. Run the following command:
|
1
|
yum install wget nano –y
|
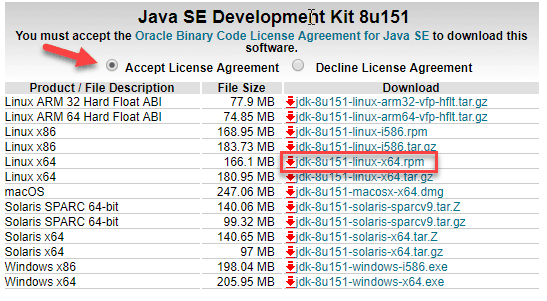
Next you need to install the Java Development Kit (JDK). Go to the JDK 8 download page on the Oracle website . Click the Accept License Agreement button and copy the appropriate .rpm package download link:
Download JDK 8 RPM with the following command:
|
1
|
wget —no–cookies —no–check–certificate —header “Cookie: gpw_e24=http%3A%2F%2Fwww.oracle.com%2F; oraclelicense=accept-securebackup-cookie” “http://download.oracle.com/otn-pub/java/jdk/8u151-b12/e758a0de34e24606bca991d704f6dcbf/jdk-8u151-linux-x64.rpm”
|
Remember to change the version number to suit your situation. Next install the JDK with the following command:
|
1
|
yum localinstall jdk–8u151–linux–x64.rpm
|
Once Java is installed you check the Java version with the following command:
|
1
|
java –version
|
You will see results like this:

Setting up the Java Home environment
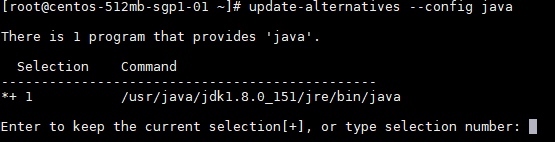
Before starting to install Tomcat you need to set up a Java Home environment, check the location of Java installation with the following command:
|
1
|
update–alternatives —config java
|
You will see results like below:
Now edit the environment file (/etc/environment) with the nano editor:
|
1
|
nano /etc/environment
|
Add environment variable like this:
|
1
|
JAVA_HOME=“/usr/java/jdk1.8.0_151/jre”
|

Save the file and exit nano.
Next, edit the .bash_profile file:
|
1
|
nano ~/.bash_profile
|
Add environment variable as below:
|
1
2
|
export JAVA_HOME=/usr/java/jdk1.8.0_151/jre
export PATH=$JAVA_HOME/bin:$PATH
|
Save the file and exit nano.
Reload the .bash_profile file with the following command:
|
1
|
source ~/.bash_profile
|
Check the JAVA_HOME variable again with the following command:
|
1
|
echo $JAVA_HOME
|
You will see results like below:

Install Apache Tomcat 9
First we create a tomcat group:
|
1
|
groupadd tomcat
|
Next, they add a user tomcat to this group:
|
1
|
useradd –s /bin/false –g tomcat –d /opt/tomcat tomcat
|
-s /bin/false: disable shell access
-g tomcat: assign new user to tomcat group
-d /opt/tomcat: user’s home directory.
Download and install Apache Tomcat:
Navigate to the /opt directory with the following command:
|
1
|
cd /opt/
|
Download the latest version of Apache Tomcat 9 :
|
1
|
wget http://www-us.apache.org/dist/tomcat/tomcat-9/v9.0.1/bin/apache-tomcat-9.0.1.tar.gz
|
Now extract with tar command like below:
|
1
|
tar –xzvf apache–tomcat–9.0.1.tar.gz
|
Move all files located in apache-tomcat-9.0.1 to the tomcat directory:
|
1
|
mv apache–tomcat–9.0.1/* tomcat/
|
Change ownership of the tomcat directory with the following command:
|
1
|
chown –hR tomcat:tomcat tomcat
|
Create service file
You need to create service file so it will be easy to start, stop or restart apache tomcat service.
Run the following command to create the service file:
|
1
|
nano /etc/systemd/system/tomcat.service
|
Copy and paste the content below into the service file:
|
1
2
3
4
5
6
7
8
9
10
11
12
13
14
15
|
[Unit]
Description=Apache Tomcat 9 Servlet Container
After=syslog.target network.target
[Service]
User=tomcat
Group=tomcat
Type=forking
Environment=CATALINA_PID=/opt/tomcat/tomcat.pid
Environment=CATALINA_HOME=/opt/tomcat
Environment=CATALINA_BASE=/opt/tomcat
ExecStart=/opt/tomcat/bin/startup.sh
ExecStop=/opt/tomcat/bin/shutdown.sh
Restart=on–failure
[Install]
WantedBy=multi–user.target
|
Save and exit nano. Then run the following commands to start the tomcat service and enable the service on server restart:
|
1
2
3
|
systemctl daemon–reload
systemctl start tomcat
systemctl enable tomcat
|
Tomcat will start and listen on port 8080. You can check with the following command:
|
1
|
netstat –plntu
|
Run the following command to check the status of the tomcat service:
|
1
|
systemctl status tomcat
|
Now you open your browser and go to http://your_ip_address:8080 . You will see the Apache Tomcat homepage as follows:

Configure Tomcat User
You modify tomcat-users.xml to use nano:
|
1
2
|
cd /opt/tomcat/conf/
nano tomcat–users.xml
|
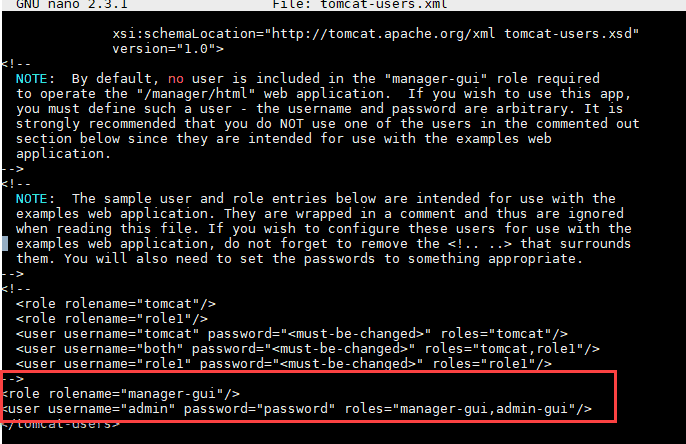
Add the following content:
|
1
2
|
<role rolename=“manager-gui”/>
<user username=“admin” password=“password” roles=“manager-gui,admin-gui”/>
|
The final file is as follows:
Default manager gui and admin gui only access from localhost. So you need to edit the context file for remote access.
First you edit the context.xml file in webapps:
|
1
2
|
cd /opt/tomcat/webapps/manager/META–INF/
nano context.xml
|
Comment the code as below:
|
1
2
|
<!— <Valve className=“org.apache.catalina.valves.RemoteAddrValve”
allow=“127\.\d+\.\d+\.\d+|::1|0:0:0:0:0:0:0:1” /> —>
|

Edit the remaining context.xml file with the following command:
|
1
2
|
cd /opt/tomcat/webapps/host–manager/META–INF/
nano context.xml
|
Comment code similar to above:
|
1
2
|
<!— <Valve className=“org.apache.catalina.valves.RemoteAddrValve”
allow=“127\.\d+\.\d+\.\d+|::1|0:0:0:0:0:0:0:1” /> —>
|
Save the file and restart tomcat:
|
1
|
systemctl restart tomcat
|
Firewall configuration Firewalld
In case you have not installed the Firewalld firewall you can install it using the following command:
|
1
|
yum install firewalld
|
Turn on the firewall and let it run on reboot:
|
1
2
|
systemctl start firewalld
systemctl enable firewalld
|
Now you add tomcat port 8080 to the firewall with the following command:
|
1
|
firewall–cmd —zone=public —permanent —add–port=8080/tcp
|
You will see the result: success.
Now you reload the firewall using the following command:
|
1
|
firewall–cmd —reload
|
You can check all the ports and services that are open with the following command:
|
1
2
|
firewall–cmd —list–ports
firewall–cmd —list–services
|
So far you have learned how to install Apache Tomcat 9 on Centos 7.
How to start Tomcat at port 80
To start Tomcat at port 80 so you no longer enter the port when accessing, there is only one way as follows. Type in the following 2 commands. These commands will forward port 80 to port 8080 that Tomcat is listening on:
|
1
2
|
iptables –t nat –A PREROUTING –p tcp –m tcp —dport 80 –j REDIRECT —to–ports 8080
iptables –t nat –A PREROUTING –p udp –m udp —dport 80 –j REDIRECT —to–ports 8080
|
Note: Changing the server.xml file from port 8080 to 80 will not work because we are starting Tomcat not the root user. Users who are not root will not have permission to open the port. See discussion HERE
If you have problems with the installation, leave a comment below.


