

Setting up taxes can be the first task when you create a sales website with Woocommerce.
So, in today’s lesson, I’ll show you how to set up taxes.
First of all, we have to enable the tax feature.
Contents
Enable tax
To activate the tax feature, go to Woocommerce -> Settings -> General and check the box Enable tax and calculate tax

Tax setting options
After you successfully activate tax, you will see a new tab named Tax. Here, you will set up taxes for your store.
Here is the Tax Options detail screen:
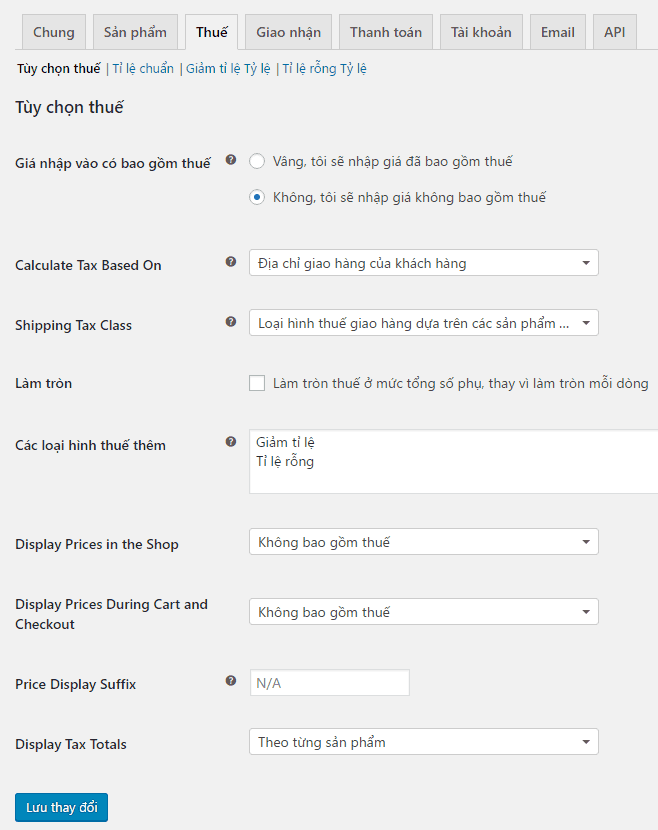
Input price includes tax : Select the price including tax or excluding tax. If you choose a tax-exclusive price, tax will be calculated at the checkout page.
Calculate Tax Based On : This setting determines which address will be used for tax calculation.
Shipping Tax Classes : Select the type of tax you want. By default, there are 3 types: Standard Scale, Reduced Scale and Empty Scale.
Round : Select if you want to round money to the nearest even number from the total order value after tax.
Additional tax types : Declare additional tax calculation types if you need to use more than the 2 default types, which are Reduced Rate and Empty Rate. Each additional tax is listed at the top of the tax setup screen. Click on each tax to set the tax rate.
Show in-store prices : You want to display product prices on your website as tax-inclusive or tax-exclusive.
Display cart price and checkout process : Select the price in the cart and checkout with or without tax.
Suffix of value : Specify the text content displayed after the product price. For example, the word “tax included”. You can use the keyword [price_including_tax] to display tax-inclusive prices and the keyword [price_excluding_tax] to display tax-exclusive prices.
Show total tax : Display tax amount based on each product or the whole order.
Set tax rate
By default, Woocommerce provides you with 3 types of tax calculation: standard rate, reduced rate and empty rate. Standard rates will apply to all products. Other types of taxes will be used on some special products, for example. Names like rate reduction and void rate you can change in Tax Options -> Additional Tax Types .
As you can see, the tax calculation type will be displayed on the top of the tax setup screen. Click on each type of tax, you will see the details of the tax rate of that type of tax.
Now we click on the standard aspect ratio type. To add a tax rate, click Insert Row to get started.

Each tax rate has the following properties:
Country code : Alpha-2 format code with 2 capital letters representing the country. For example VN is Vietnam, see the country code list here. ( https://en.wikipedia.org/wiki/ISO_3166-1#Current_codes ).
State code : Applies to the US, ISO format codes of the states.
Postal Code : The local postal code number. Sales in Vietnam do not need this information.
City : Name of the city where the tax is to be established, using ; to add more cities
Percentage : The percentage of the tax based on the product price. For example 10 is 10%
Tax Name : The name of the tax to be displayed on the payment page. Example: VAT.
Priority : The priority number of the tax rate to which it will apply. Important when you set up different tax rates.
Mixed : Choose whether this is a mixed tariff. Mixed tax rates are applied on top of other taxes.
Delivery : Check if you want to apply this tax rate to delivery.
The following example creates a tax rate named VAT with an export tax rate of 10% that applies to provinces in Vietnam:

After creating, you go to the homepage, add products to the cart, go to the checkout page, select the country. You will see the tax calculated as follows:

Example of setting up multiple taxes
First of all, we rename the Tax Reduce Rate and Empty Rate to Tax on Motorcycles and Tax on Cars.

Now if we want to apply multiple taxes to cars. You enter tax for cars and set up as below:
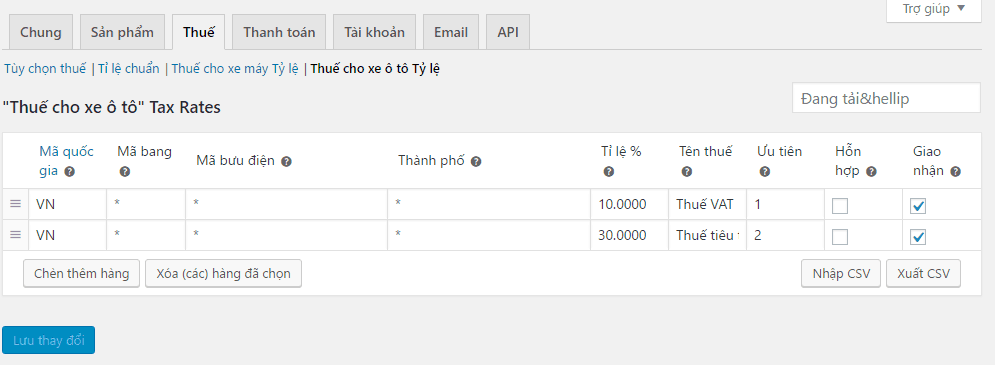
In this example, I have created 2 tax rates: standard 10% VAT and 30% excise tax.
Next, you apply the tax to the product you want. By default, the products will be applied the standard ratio. If you want to apply a different tax, you must change the product information input:

Now we go to the checkout screen to see how the product is subject to multiple taxes displayed.

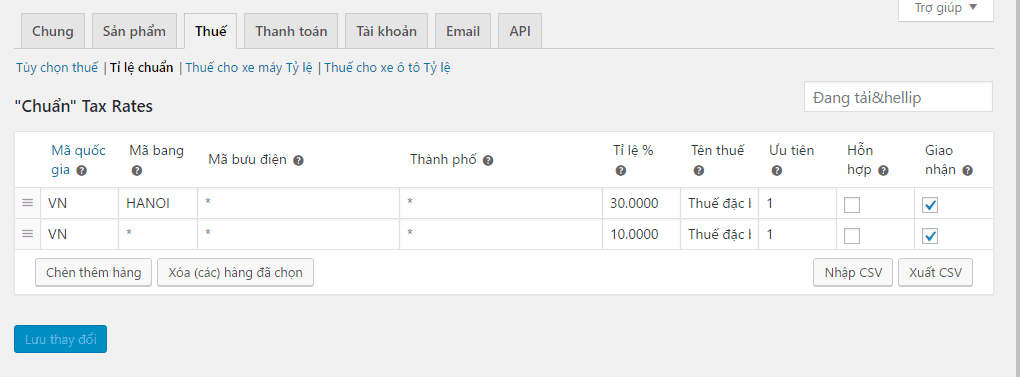
Tax calculation by city code in Vietnam
In the previous post, I mentioned the Vietnam Woocommerce Currency plugin to help you add a province to Woocommerce.
Before applying the tax calculation according to the city code, you need to note:
- You enter the city code in the state code, not the City
- The city code of Vietnam is the name of the province in CAPITAL and without spaces. For example, Hanoi has the corresponding code HANOI.
Suppose we apply a tax rate of 30% for Hanoi, and the remaining provinces are 20%. You set the following:
Now let’s test it on the payment screen. First you choose the case of ordering in Hanoi. You see the 30% tax has been applied:
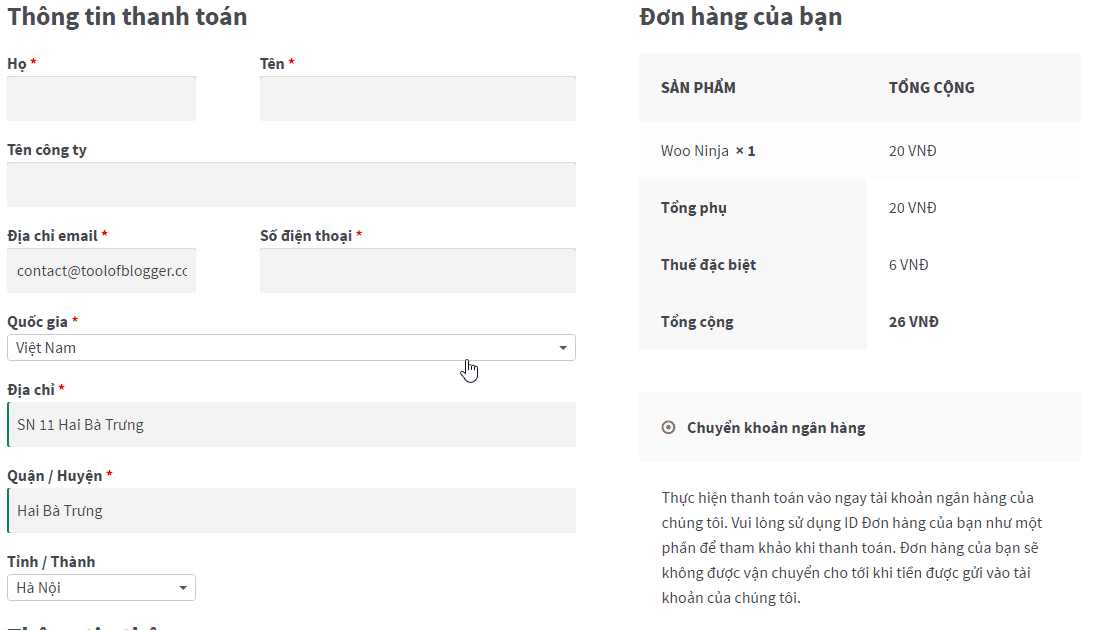
If you place an order to another province, the tax rate will be changed to 10%.

Epilogue
As such, this article has helped you understand how to set up taxes in Woocommerce. You also learn how to set up various taxes.
Finally, you can set up taxes by province.


