

Hacking to get username and password is a common form of attack with WordPress sites.
You can use many ways to prevent such attacks.
Such as:
You change the admin page access path
You do not use the common username admin and set a password with a high difficulty.
You install a popular security plugin like iThemes Security.
But you are still not really secure.
Today I will give you one more way.
That’s using Google Authenticator’s 2-factor security. To use this security feature you need to have a smartphone.
In this day and age, everyone’s family has a smartphone. So it’s not difficult to ask, right?
Contents
How does 2-layer security work?
The form of 2-layer security is no longer strange. You must have known it through daily banking activities such as money transfer, payment via Internet Banking.
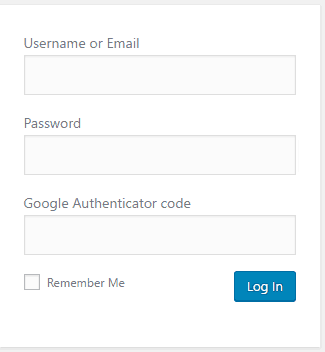
Likewise, in addition to the default username and password to log in, you need a 6-digit Google Authenticator code. This code will be provided via your personal phone.
This code is only valid for a short period of time. As soon as you complete the instructions below, the login screen will have a new field like the image below:
How to Install Google Authenticator in WordPress
We install the Google Authenticator plugin .
Once installed, go to Users -> Your Profile . Scroll down and you will see Google Authenticator Setting as below

You tick the Active box to use the 2-layer security feature of Google Authenticator. Then you click the Show/Hide QR Code button to display the QR Code. Draw out this code so we can scan it with the phone later.
The installation process in WordPress is just that. The other parts you keep the same.
Relaxed Mode : Normally the authentication code is only valid for one minute. If you feel your typing speed is too slow, choose this function. This function will increase the time to 4 minutes. But the simple 6-character code that you can’t enter within 1 minute sounds a bit funny.
Description and Secret Key : Description is your account name in the Google Authenticator app. You use secret if you do not want to install through Barcode as I will mention below. Setting up a barcode is obviously much simpler, why need a secret. The reason is because you cannot have a space in the description when you want to install via barcode on iPhone. If you want a space you have to set it manually via secret.
Enable App Password : you only enable this feature when you use XML-RPC on your blog. Overall this reduces the security of the login screen. Therefore, you should not enable this option.
Install Google Authenticator on your phone
Here I only have iPhone, so I will guide you on iPhone. But the installation process is similar for other smartphone operating systems.
In the AppStore you find an app called Google Authenticator and install it. Once the installation is complete, you will see the setup screen. You choose Scan barcode.

Scan the barcode that pops out above. After the scan is successful, you will see the login code.

Now you logout and login with this code
Epilogue
So I have guided you to successfully install Google Authenticator for WordPress.
Now the difficulty to hack the login screen to the admin page has become much more difficult.
If you liked the article, please share it with others with similar interests.
Icon made by http://www.flaticon.com/authors/madebyoliver from www.flaticon.com


