

Your website data is always at risk of being deleted. It could be a hacker or a silly mistake on your part. Therefore, creating backups for your website is a must.
On Toolofblogger, I shared with you how to manually backup your website , as well as how to use a free backup plugin like UpdraftPlus .
The above free backup solutions cannot be considered the best. But if you use the hosting service of Hawk Host , you will have a more professional backup and restore solution. Previously, Hawk Host used R1Soft Backups service. Recently Hawk Host has switched to JetBackup’s service.
So what is JetBackup and how to restore a website using JetBackup.
In this article, you will learn how to use JetBackup included in Hawk Host’s cPanel.
What is JetBackup?
JetBackup is the leading backup service for cPanel. Luckily, Hawk Host has integrated this great backup tool into its cPanel. And it’s even better that it offers free backup service for all channels.
Talking about data backup of JetBackup, this application will back up data on its own server. So it does not affect the performance of your website placed on Hawk Host. In addition, it performs backups in a progressive fashion. That means it will create a full backup the first time. Then it only backs up the changed files.
When you want to restore data, JetBackup will download data from its server to hosting. The restore process is as simple as that.
Website restores using JetBackup
In this section, I will show you how to use JetBackup through a practical example. Specifically, I will restore a demo website lookwp.info that I installed on Hawk Host.
To use JetBackup, you must log in to Hawk Host’s cPanel.
As soon as you log in, you will see a new section called JetBackup.

To restore a website you usually do 2 steps. First you restore all the files of the website. Then you proceed to restore the database.
Now we will restore all the files and folders of the website. Click on Files Backups to start the file recovery process.
The next screen shows a list of the most recent backups. To choose which files or folders to restore, click File Manger in the line with the time that matches the time you want to restore.

On the next screen, you will select the folder you want to restore. Because my website lookwp.info is not the main domain. I added this website to my host as an add-on domain. So I will have a folder called lookwp.info on the server.
Now I will restore this folder. Therefore, I choose the lookwp.info directory to restore. In case you want to restore the main domain, choose the public-html root directory . After selecting the folder to restore, scroll down and click the Download Sleeted Files button .

At this point, JetBackup will transfer all files from its server to the Hawk Host. After the data transfer is complete, you will see the download link of the backup file on the right side. This file is already in the Hawk Host’s file system. So you don’t need to download it to your computer.

Now you will use cPanel’s FileManager to find the backup file and extract it to overwrite your website’s source code folder.
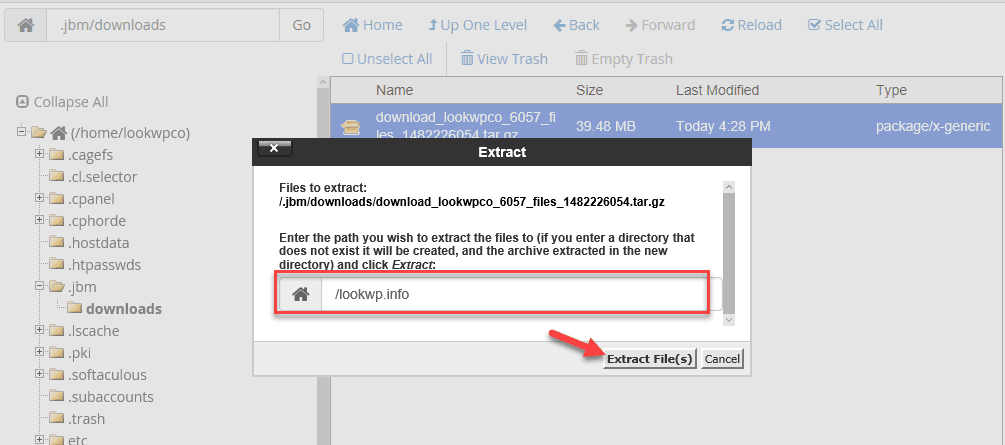
The backup file will be located in the .jbm/downloads folder . If you don’t see this file, click Settings in the left corner. A dialog box pops up. You choose Show Hiddene files (dotfiles) .

Surely now you will see the backup file that JetBackup downloaded above.

Right click on this file. In the context menu, click on Extract .

Now you are asked to enter the destination directory. In my case, I chose the lookwp.info folder to overwrite all the files in it. Make sure you change the value to suit your scenario. Next, click on the Extract Files button .
With that, you’ve finished restoring all of your website’s files.
Next, we will restore the database part.
Return to the JetBackup section in the cPanel homepage interface. Now click on Database Backups .
The next screen shows a list of backups for all the databases you have installed. On this screen, you have 2 options. Either you restore the database. Or download a data backup. Here I click the Restore link corresponding to the database I want to restore.

In the pop-up dialog box, select the option ” I have read and understand the above terms and conditions “. Enter your email address to receive a notification when the restore is complete. Finally Click on the Restore button .

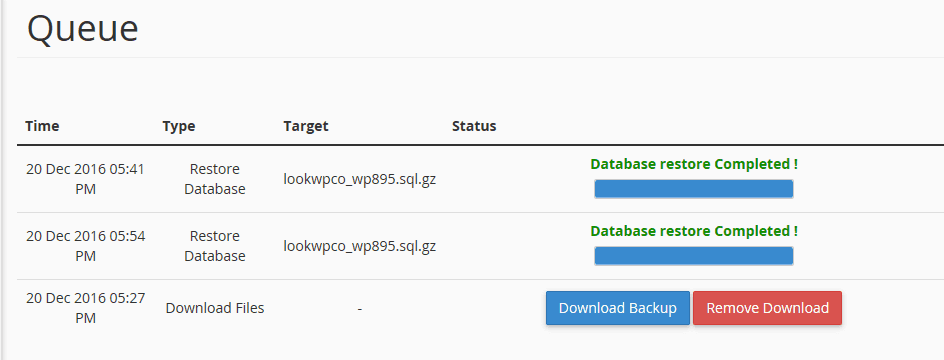
To check the data recovery status, you can click Queue in JetBackup. If the restore is successful you will see the following screen:
That is all. The process of restoring a website using JetBacup is too simple, isn’t it.
Epilogue
Before, I had to rely on the Updraft plugin to automatically backup my website. I configured this plugin to store backups on Dropbox. Sometimes I have to go to Dropbox to manually delete old backups. This is annoying and time consuming.
Of course I know there are many professional backup services out there. The cost of these services is also not small. I don’t have enough budget to use that service for many websites at once.
Now, with JetBackup, I no longer have to worry about daily website backups. I also do not need to install a backup plugin for the website. The best part is that Hawk Host offers this tool for free.
JetBackup is just one of many great features that Hawk Host brings to its customers.
You can check out my detailed Hawk Host review here . I also have many articles showing you how to use the many powerful features available in Hawk Host’s hosting service.
Read more:
Instructions for using the Memcached feature on Hawk Host’s hosting
Instructions to upgrade PHP 7.1 for hosting at Hawk Host
Speed up WordPress with LiteSpeed Cache
If you are planning to buy hosting here, don’t forget to get the discount code here .
Let me know any of your questions regarding Hawkhost’s hosting service in the comments section below.
If you found this article helpful, don’t forget to share it with your friends on Facebook.


