

HocVPS does not integrate the Let’s Encrypt certificate installation feature. So you install it manually like this guide on hocvps .
But that tutorial is quite complicated.
In this article, I will show you how to install Let’s Encrypt SSL certificate using Certbot. It is simple and suitable for those who are new to VPS.
Let’s start together.
Contents
Install Certbot
First you install Certbot using the following commands:
|
1
2
|
yum install epel–release
yum install certbot–nginx
|
Install Let’s Encrypt SSL certificate using Cerbot
You use the following command to install the certificate:
|
1
|
certbot —nginx –d khamphaso.com –d www.khamphaso.com
|
You need to enter your email address and answer a few questions as follows:


Automatic Let’s Encrypt certificate renewal
|
1
2
|
export VISUAL=nano; crontab –e
15 3 * * * /usr/bin/certbot renew —quiet
|
Enable HTTP/2
The Certbot configuration added to nginx does not support HTTP/2. Open the configuration file:
|
1
|
nano /etc/nginx/conf.d/khamphaso.com.conf
|
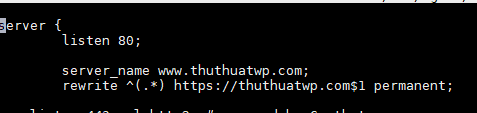
Then add http2 to the 2 paragraphs with


At the same time you convert http to https in the rewrite line:
Enable HTTP/2 for NGINX and optimize HTTPS
Nginx is having problems with HTTP2. You can see more in this article.
HocVPS has a post to enable HTTP2. You see here.
But I like to install Nginx compiler from Vultr .
I will show you how to do this.
Install Developer Tools:
|
1
|
yum groupinstall –y ‘Development Tools’
|
Download and install dependent Nginx libraries
|
1
|
yum install –y perl perl–devel perl–ExtUtils–Embed libxslt libxslt–devel libxml2 libxml2–devel gd gd–devel GeoIP GeoIP–devel
|
Download and extract the latest Nginx mainline version:
|
1
2
|
cd /root/
wget https://nginx.org/download/nginx-1.13.2.tar.gz && tar zxvf nginx-1.13.2.tar.gz
|
Load libraries that will compile with Nginx
|
1
2
3
4
5
6
7
8
|
# PCRE version 8.40
wget https://ftp.pcre.org/pub/pcre/pcre-8.40.tar.gz && tar xzvf pcre-8.40.tar.gz
# zlib version 1.2.11
wget https://www.zlib.net/zlib-1.2.11.tar.gz && tar xzvf zlib-1.2.11.tar.gz
# OpenSSL version 1.1.0f
wget https://www.openssl.org/source/openssl-1.1.0f.tar.gz && tar xzvf openssl-1.1.0f.tar.gz
|
Remove .tar.gz files
|
1
|
rm –rf *.tar.gz
|
Go to Nginx source code directory:
|
1
|
cd ~/nginx–1.13.2
|
Copy the Nginx manual page to /usr/share/man/man8 :
|
1
2
|
cp ~/nginx–1.13.2/man/nginx.8 /usr/share/man/man8
gzip /usr/share/man/man8/nginx.8
|
Compile and install Nginx:
|
1
2
3
4
5
6
7
8
9
10
11
12
13
14
15
16
17
18
19
20
21
22
23
24
25
26
27
28
29
30
31
32
33
34
35
36
37
38
39
40
41
42
43
44
45
46
47
48
49
50
51
52
53
54
55
56
57
58
|
./configure —prefix=/etc/nginx \
—sbin–path=/usr/sbin/nginx \
—modules–path=/usr/lib64/nginx/modules \
—conf–path=/etc/nginx/nginx.conf \
—error–log–path=/var/log/nginx/error.log \
—pid–path=/var/run/nginx.pid \
—lock–path=/var/run/nginx.lock \
—user=nginx \
—group=nginx \
—build=CentOS \
—builddir=nginx–1.13.2 \
—with–select_module \
—with–poll_module \
—with–threads \
—with–file–aio \
—with–http_ssl_module \
—with–http_v2_module \
—with–http_realip_module \
—with–http_addition_module \
—with–http_xslt_module=dynamic \
—with–http_image_filter_module=dynamic \
—with–http_geoip_module=dynamic \
—with–http_sub_module \
—with–http_dav_module \
—with–http_flv_module \
—with–http_mp4_module \
—with–http_gunzip_module \
—with–http_gzip_static_module \
—with–http_auth_request_module \
—with–http_random_index_module \
—with–http_secure_link_module \
—with–http_degradation_module \
—with–http_slice_module \
—with–http_stub_status_module \
—http–log–path=/var/log/nginx/access.log \
—http–client–body–temp–path=/var/cache/nginx/client_temp \
—http–proxy–temp–path=/var/cache/nginx/proxy_temp \
—http–fastcgi–temp–path=/var/cache/nginx/fastcgi_temp \
—http–uwsgi–temp–path=/var/cache/nginx/uwsgi_temp \
—http–scgi–temp–path=/var/cache/nginx/scgi_temp \
—with–mail=dynamic \
—with–mail_ssl_module \
—with–stream=dynamic \
—with–stream_ssl_module \
—with–stream_realip_module \
—with–stream_geoip_module=dynamic \
—with–stream_ssl_preread_module \
—with–compat \
—with–pcre=../pcre–8.40 \
—with–pcre–jit \
—with–zlib=../zlib–1.2.11 \
—with–openssl=../openssl–1.1.0f \
—with–openssl–opt=no–nextprotoneg \
—with–debug
make
sudo make install
|
Restart Nginx:
|
1
|
systemctl restart nginx
|
Check Nginx version again
|
1
|
nginx –V
|
An OpenSSL version like this is OK:
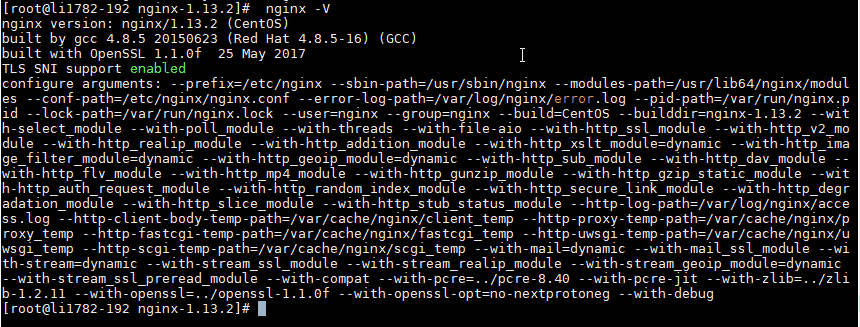
Check again you will see that the Http/2 protocol is enabled:
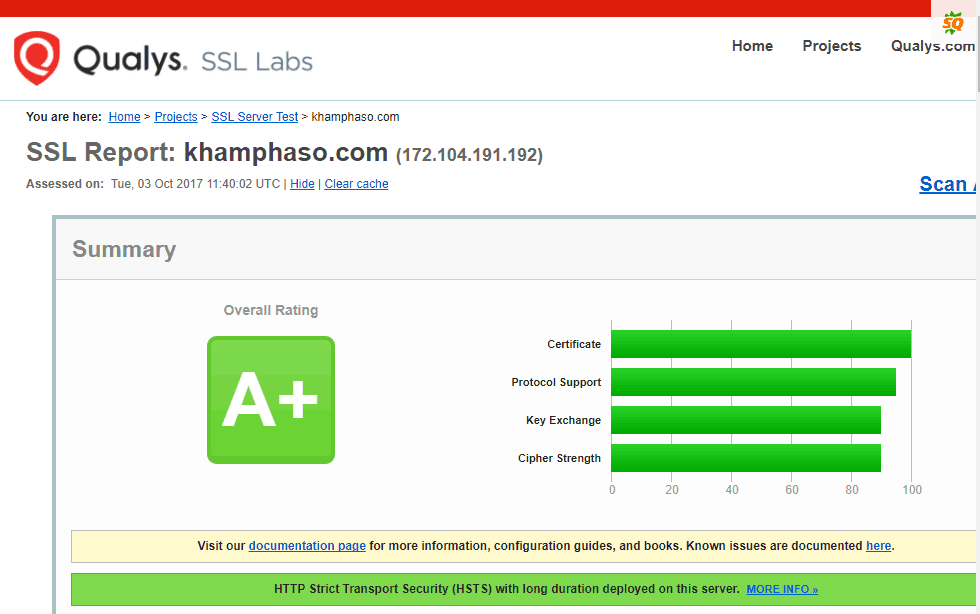
Optimizing Https to test SSL Lab Test is A+ as below:
How to optimize you see this article .
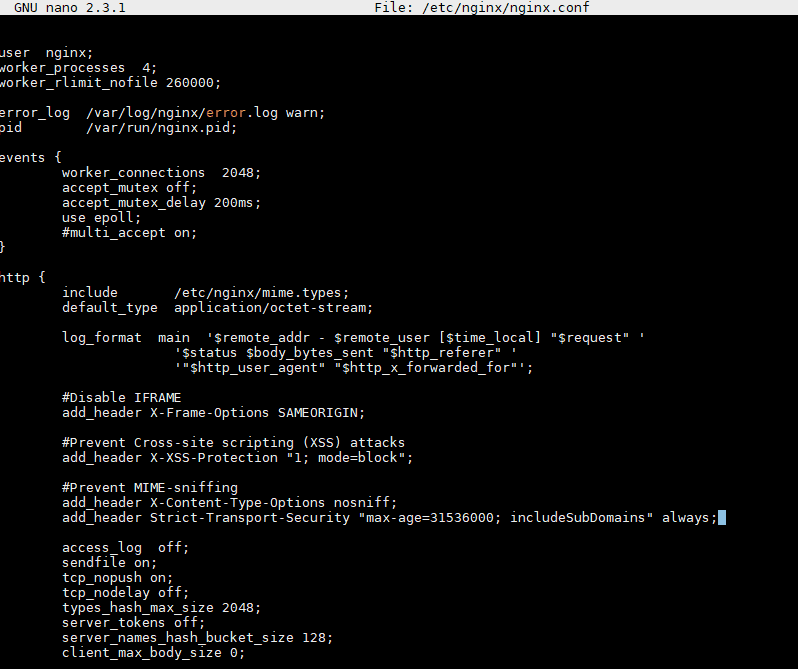
You just need to configure Nginx to support HSTS (point 6 in the article) is enough.
Add the following line to the Nginx configuration file and restart Nginx:
|
1
|
add_header Strict–Transport–Security “max-age=31536000; includeSubDomains” always;
|
It’s done.
With the above simple way, installing the Let’s Encrypt certificate no longer has to be manually configured like in hocvps.


